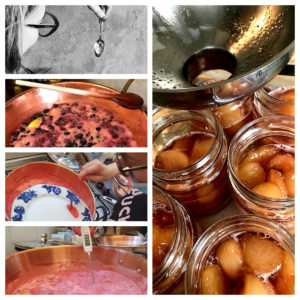
JAM RULES!

Rules is rules when it comes to jam:

  1. Prepare everything in advance. Jam making happens fast and good jam is all in the preparation.
  2. Use your best heavy bottomed pan if you do not have a  jam pan.  You must allow for evaporation and foaming up.  Do not crowd the pan. The jam ingredients should only half fill the pan
  3. Make jam in small quantities. Its what my Nana taught me and she was right. (there is in fact a scientific reason for this to do with boiling and surface area and evapouraton prior to setting)
  4. Bacteria love jam.  You must be scrupulously clean and sterilise stuff.  Wash all jars and equipment for stirring/skimming/jarring in a solution of bicarbonate of soda
  5. Set jams are traditional in the UK and France where there is much angst over it! Setting is a chemical reaction between sugar and pectin which results in jellification and occurs at 105C.  Fruits vary in pectin levels. Ripeness affects pectin too. Residual water content also affects the soft or hard set.  In Turkey, Romania and other Balkan countries jam is boiled just until the water is driven out – resulting in fresher tasting “soft set” jams. 
  6. I test for setting by placing jam on a saucer placed in the freezer. when it doesn’t run when vertical or “wrinkles” when pushed it is set. This is the one time in life when wrinkles are a good thing. If I am in doubt I use a sugar thermometer. To be sure I take my jam to between 106-108C. When I don’t have any equipment I use my eyes and ears: the bubbles change size, the noise of the jam boiling changes and the appearance becomes “glassy”.
  7. I increase pectin levels by making apple juice and apple puree from under ripe apples and adding this to jams. That way I dont need to add any extra pectin except when making no added sugar jam.
  8. Pour jam into clean jars heated to 100C –  I do use a proper stainless steel jam filler but a ladle is fine if you have good hand to eye co-ordination (I don’t). If you have a super-duper dishwasher and are well timed you can set it at its hottest setting and wizz your too hot to handle jars out of the dishwasher straight to be filled.
  9. Fill to the shoulders of the jar, screw the cap on fast, invert and let the 100C- plus jam sterilise that air gap and kill off any bacteria. North Americans and central Europeans like water bathing jams; I do too for low sugar and/or low acidity jams. Put them in a big pan of water with a folded tea towel inside the pan and boil gently up for 20 minutes or use a water bath.

Lemon Confit or Preserved lemons

If ever there was a case to prove the alchemic effects of salt it is this.

the right amount of salt

The salt transforms the bitter white pith into something palatable, renders the skin translucent and keeps the lemons from rotting – magic indeed.Because the salt renders the lemons less bitter the resulting skin, once rinsed, can also be used in sweets.

I first “discovered” preserved lemons by way of Alastair Little in his inspirational “Food of the Sun” and indeed it is his method  I always follow although I have adapted slightly for a smaller jar. Since then I have lived in Turkey and travelled in Morocco where I could taste and see at first hand all the different ways of using these precious orbs. I was particularly taken with the “mini” preserved lemons that I bought in Morocco which I used halved in tagines and to stuff mackerel (the lemon works great with oily fish).

Uses

I chop them very fine and add to couscous, salads and soupe. I use them in dips and pestos where I want a lot of lemon flavour and no bitterness-in particular in a roast red pepper and confit lemon dip. They are a vital ingredient in tagines and they add an intensity to roast chicken.  Best of all when you have run short of lemons you know you always have some in the store cupboard. Generally most recipes call for using the rind only (you just pull out the flesh easily) but as long as there are no pips and depending on the recipe I often use them flesh and all.

Ingredients – for 1 x 500ml kilner jar

  • Fine salt to cover and surround all the lemon pieces – approx 200g (I find it encourages less air pockets)
  • 3 lemons well scrubbed and cut into quarters. If you have time to pick out pips then its worth it.

Cover the base of the jar with approx 1cm of salt. Place your lemons in trying to arrange them all to really fill the jar but allowing space between them for salt. Old fashioned earthenware crocks are ideal because the salt does corrode the metal clips on a kilner jar and I have quite a few distressed looking jars to prove this.  Keep alternating with salt and lemons until you have squished in as much as you can.  You do not want any air pockets as air = mould.

Put the lid on the jar and give a good shake. Leave to settle for an hour or so and them top up with salt.  If you are a bit unsure add a little water to make sure absolutely no air.


For the next week give the jars a shake and turn them this way and that.  The salt will suck the juice from the lemons and a briny lemony liquid will be created.  Once the salt is all liquid they then need to sit for a few days.  They are ready when the skin is translucent – generally 7-10 days but depends on the salt, the lemon variety and how big the lemons were.  A month is ideal really.

confit lemons final


White Chocolate Panna Cotta with Strawberry & Basil Salsa

“the perfect panna cotta should wobble like a woman’s breast” IMG_4228

This was the edict of an Italian silver haired chef handed down when I dared to go discuss in the kitchen and ask for his recipe in a small hilltop town outside Rome. I did not argue nor press on detail (silicone? age specific wobbles?) because it was obvious that all things round and wobbly were a good thing in his book. Now if metaphors of the flesh are a bit too much for a humble milk jelly then just know that when pushed it should react like a jelly and it should feel like a delicate custard that melts in the mouth.

The turned out version:

IMG_4231

One word of warning, while making panna cotta is simplicity itself turning them out can be nerve wracking – especially after a few drinks at a dinner party.  The cheating solution is to serve in the glass you made them in but if you want to turn out then lower the mould you have used (a rounded cappucino cup with no angles/nooks and crannies for the panna cotta to adhere to when you are trying to turn it out is really still the best thing) into a deep tray or bowl of boiling water for 2 minutes. This melts the gelatine on the outside. Lift out very carefully. Skim around the edge with a small knife. Place a serving plate over the top and invert. Now decorate your masterpiece.

So now …back to the Panna Cotta…

Panna Cotta or “cooked cream” is another one of those oh so simple Italian dishes that relies on simple but good ingredients.  Its essentially a cream jelly that is set with gelatine.  It can be embellished and enriched by adding white chocolate which means that you need a little less gelatine. I like to do this because I think it has a greater “melt in your mouth” feel.

Ingredients – White Chocolate Panna Cotta – 6 servings

  • 500ml smantana dulce 30%-32% (heavy cream or double cream)
  • 150ml lapte 3.5% (milk)
  • 100g ciocolata alba  (white chocolate broken into pieces)
  • 25g zahar (sugar)
  • 10g gelatine + 100ml apa rece (gelatine powder plus 100ml cold water)
  • 1 tsp vanilie (vanilla extract)

I’ve written the Romanian first because its quite tricky to get the right cream.

How To

First dissolve your gelatine in the cold water – it will kind of go spongy and absorb the water. I like to wisk it so it kind of gets a little frothy and this way I know that its properly dissolved.

Heat the cream, sugar and milk on the stove until just boiling but be careful not to burn it and create brown bits of “stuff” floating in it.

Remove from the heat!

Throw in the white chocolate until it melts and is incorporated – dont stir until it has melted. Now add the vanilla.

Now give it a good whisk

Pour into cappuccino cups and place in the refrigerator (preferably overnight)  (if you have other strong smelling food in the fridge then cover with cling film because dairy products absorb smells and odours like sponges)

Strawberry & Basil Salsa

The amount of fruit depends really if you want a fruit salsa dish with panna cotta or a panna cotta with a fruit salsa…I reckon 1 kg of strawberies makes a decent amount of salsa for 6. and what is left over blend into a smoothie.

Take half the fruit and cut into small cubes approx 1cm across.

The other half blend to a puree.

Shred basil leaves fairly finely as you dont actually want large leaves in this salsa but neither do you want the basil to be pureed because it would change the bright red colour into a dingy brown.

Add a little lemon juice if you like things tart.

Spoon the salsa on the panna cotta either in the glass or turned out and serve immediately.

The panna cotta can be made up to two days ahead. the salsa is best made fresh. If you are really in a rush skip the fiddly cube bits and just create a puree.