White Chocolate Panna Cotta with Strawberry & Basil Salsa

“the perfect panna cotta should wobble like a woman’s breast” IMG_4228

This was the edict of an Italian silver haired chef handed down when I dared to go discuss in the kitchen and ask for his recipe in a small hilltop town outside Rome. I did not argue nor press on detail (silicone? age specific wobbles?) because it was obvious that all things round and wobbly were a good thing in his book. Now if metaphors of the flesh are a bit too much for a humble milk jelly then just know that when pushed it should react like a jelly and it should feel like a delicate custard that melts in the mouth.

The turned out version:

IMG_4231

One word of warning, while making panna cotta is simplicity itself turning them out can be nerve wracking – especially after a few drinks at a dinner party.  The cheating solution is to serve in the glass you made them in but if you want to turn out then lower the mould you have used (a rounded cappucino cup with no angles/nooks and crannies for the panna cotta to adhere to when you are trying to turn it out is really still the best thing) into a deep tray or bowl of boiling water for 2 minutes. This melts the gelatine on the outside. Lift out very carefully. Skim around the edge with a small knife. Place a serving plate over the top and invert. Now decorate your masterpiece.

So now …back to the Panna Cotta…

Panna Cotta or “cooked cream” is another one of those oh so simple Italian dishes that relies on simple but good ingredients.  Its essentially a cream jelly that is set with gelatine.  It can be embellished and enriched by adding white chocolate which means that you need a little less gelatine. I like to do this because I think it has a greater “melt in your mouth” feel.

Ingredients – White Chocolate Panna Cotta – 6 servings

  • 500ml smantana dulce 30%-32% (heavy cream or double cream)
  • 150ml lapte 3.5% (milk)
  • 100g ciocolata alba  (white chocolate broken into pieces)
  • 25g zahar (sugar)
  • 10g gelatine + 100ml apa rece (gelatine powder plus 100ml cold water)
  • 1 tsp vanilie (vanilla extract)

I’ve written the Romanian first because its quite tricky to get the right cream.

How To

First dissolve your gelatine in the cold water – it will kind of go spongy and absorb the water. I like to wisk it so it kind of gets a little frothy and this way I know that its properly dissolved.

Heat the cream, sugar and milk on the stove until just boiling but be careful not to burn it and create brown bits of “stuff” floating in it.

Remove from the heat!

Throw in the white chocolate until it melts and is incorporated – dont stir until it has melted. Now add the vanilla.

Now give it a good whisk

Pour into cappuccino cups and place in the refrigerator (preferably overnight)  (if you have other strong smelling food in the fridge then cover with cling film because dairy products absorb smells and odours like sponges)

Strawberry & Basil Salsa

The amount of fruit depends really if you want a fruit salsa dish with panna cotta or a panna cotta with a fruit salsa…I reckon 1 kg of strawberies makes a decent amount of salsa for 6. and what is left over blend into a smoothie.

Take half the fruit and cut into small cubes approx 1cm across.

The other half blend to a puree.

Shred basil leaves fairly finely as you dont actually want large leaves in this salsa but neither do you want the basil to be pureed because it would change the bright red colour into a dingy brown.

Add a little lemon juice if you like things tart.

Spoon the salsa on the panna cotta either in the glass or turned out and serve immediately.

The panna cotta can be made up to two days ahead. the salsa is best made fresh. If you are really in a rush skip the fiddly cube bits and just create a puree.


Blueberry & Almond Biscotti

IMG_3864

Ever since I was taken as a pretentious (and greedy) 13 year old to a cutting edge Italian in North London to sample (this was the ’70’s remember) bresaola for the first time, real fresh pasta, deep fried artichokes and a whole host of other new tastes I’ve been hooked on cantuccini (and vin santo of course which was the highlight of the meal) and biscotti.  I’ve tried extremely “authentic” recipes with a really high proportion of almonds and egg whites to leaven but the result was a sort of baked marzipan affair – very dense and very almondy but not light and crunchy at all.  This recipe is way simpler than it sounds and although yes there are two baking steps the good thing is that because of the dehydration and resulting dryness of the little biscuits they keep for an age in an airtight container.

I tried them with the blueberries for a change and I like how they look – but these will not keep for an age as the fruit is fresh – best to eat in two to three days which is hardship indeed.

Ingredients  (makes 4 mini logs and approx 35-40 biscotti)

225g plain flour
2 level teaspoons baking powder
50g ground almonds
100g almonds, skins on
150g golden caster sugar
2 large eggs

75g blueberries

Gadgets and Gizmos

As the mixture is so easy all you really need is a bowl and a spoon to mix the basic mix and then some baking trays and baking paper/parchment.

IMG_3861

How To

The basic “logs” and the first baking at 180C:

Place all the ingredients in a bowl except the blueberries.  Fork the mixture through or mix with a spoon until it comes together.  As it comes together use your hands to form a ball.  Now divide into 4. Flour your hands and the work surface.

If using blueberries or other soft fruit you need to take one of the pieces and just flatten it into a long rectangle and place the blueberries in the middle and then just roll it up like a roulade. Give it a squeeze and then pat it so it looks like a mini log.  This way the blueberries stay intact.

Place the logs on a baking sheet  or two sheets (they do expand but not dramatically) that has baking paper on it or if you don’t have make sure its oiled well. bake at 180C for approx 30 minutes or until they are a gentle golden brown. Let them cool a little but not totally and cut them on the diagonal (I grip them with a tea towel to avoid scalded hands) with a bread knife.

IMG_3862

The second baking:

Reduce the oven temperature to 150°C

Place all your little diagonals on the tray(s) again and bake until golden and crispy.  Its very easy to get distracted at this stage and end up with burnt biscotti so do keep an eye on them!  Cool them down on a wire rack and ONLY when perfectly cold put them in an airtight container.

Improvs and Ideas

Hazlenut biscotti are divine – just substitute hazlenuts.  For the classic almond variety skip the blueberries but do add a few drops of real almond essence. And for really nice end of meal biscuits I add a tablespoon of fennel seeds to the almond recipe but no almond essence.


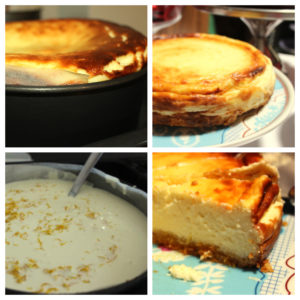
New York via Bucharest Baked Cheesecake

What is so quintessentially New York is of course good old immigrant fare. Cooking desserts with sweet cheese is part of all European sweet cooking – from Polish cheesecake (“Sernik”) to Romanian sweet cheese doughnuts (“Papanasi”) or sweet cheese pie (“Placinta de branza”) to Hungarian dill flavoured cheesecake (“Kapros (dill) Turos (curd cheese) Lepeny“) to Slovenian “prekmurska Gibanica” and more….. every country, every region, every household has a recipe.

So I thought it was a bit daft making something so rooted in the region with imported “Philadelphia” cheese and besides I think it makes a heavier cheesecake than I like. Another thing I dont like is cheesecakes made with biscuit bases – why on earth go to the trouble of making a beautiful natural filling only to make a base full of hydrogenated fats and god knows what chemicals? So after a bit of tweaking and experimenting here is my recipe that works with local Romanian ingredients and uses your basic crumble mix with an egg yolk as the base – simple simple simple!   Keep your crumble mix in bags in the freezer and you can knock up a cheesecake in 15 minutes flat. The Gluten Free base also is my GF crumble mix with an egg added so again easy and simple and no long difficult recipes just a few basic techniques linked together to create dishes.

Ingredients for quite a substantial (8-12 servings) Cheesecake in a 23cm springform tin or 6 x 10cm mini cheesecakes which are very cute

150-175g crumble mix + 1 egg yolk mixed in  (it will still be crumbly but the crumbs will stick together with the egg yolk when you press into the tin)

4 eggs

175g sugar or 120g agave nectar/honey

zest of 1 lemon

500g sour cream 30% fat content

500g “branza dulce” ie fresh sweet cheese

1 tbsp cornflour – but not essential

Gadgets & Gizmos

Yes its true a springform cake tin really does help.  If you line very well a normal tin then you can juggle with the cake when it is VERY cold ie one whole day after and flip it onto a plate and then flip it back over again.  i did actually recently do this when, alarmingly, I had all my springforms in use and I had an order for a cheesecake! It worked but its a tiny bit nerve wracking!

How to

A small trick…take a square of baking paper and place over the base of your tin BEFORE locking on the spring part with the clasp.  This really helps the cheesecake exit gracefully. I also line the tin with a little baking paper and oil again you dont have to but it makes life easier at the end.

Press the crumble and egg mixture into the base (ie on top of the paper) and bake at 180C for 8-10minutes.  leave the oven on as the filling is so easy to make the whole thing will be back in the oven in 10 minutes.

Mix gently until just incorporated, the eggs, cream, sweet cheese, sugar and lemon zest.  If you want to add a little cornflour this will stop the cake “weeping” and I personally quite like it.  however if you have a sensitive palate you might just detect something a little “floury” in the texture. up to you. Combine the cornflour with 1 tbsp milk and add the milk/cornflour mixture.

Pour the mixture on top of the base and place in the oven for 30-40minutes.  Its important that the centre still has a little wobble when you take it out.  The cake will carry on cooking and will set after you take it out of the oven but if you wait until the centre is also absolutely solid then the final result will be a bit too dry. it will inflate quite a bit and then as it cooks deflate…

Try to refrigerate over night and eat the next day as it will taste better and slice easier.  I personally like it with a raspberry coulis.